Quantcast
Channel: Coherent Labs
Viewing all 172 articles
Browse latest View live

Hummingbird 1.1 is here!

$
0
0

What is new?

In the current release of Hummingbird, we added a bunch of useful features which will help you improve the performance of your UI. Also, we introduced a tool for JS debugging and a new version of the Coherent Editor.

JS debugger for Android and Windows

The debugger is a powerful tool for debugging JavaScript. You can now add a breakpoint in your code and it will stop the execution at this particular moment so you could look at the values of the variables and the call stack.
 
JSdebugger
 

Compressed image formats for mobile – ETC and ASTC

Hummingbird now natively supports compressed textures that reduce memory footprint and improve the performance. Large images are often used in the UI (for example in menu backgrounds) and by using a compressed format you will significantly reduce the memory footprint. To get the benefit of the feature, you should just re-save large images in ETC or ASTC format.

Pre-loaded images

Loading textures in advance can significantly reduce the UI loading time. Especially on low-end devices, large image files could take a few seconds to load which affects negatively the user experience.

With this new feature, you can:
*Improve the loading time of the pages by preparing the textures in advance instead of when Hummingbird asks for them
*Reduce GPU memory usage as textures are shared by the engine and the UI and stored only once. Otherwise, the textures would be read from the disk, decoded and stored in the VRAM twice (by the game and Hummingbird)
*Use a custom image format

To use the feature, all the images should have a premultiplied alpha applied (unless the default shaders / backends are replaced).

Fallback image formats for different configurations

This feature automatically loads the right image format for the different configuration. For example, you can work with PNG format during development but in shipping configuration the library will load ETC/ASTC etc.

Compatibility with Unity 5.5

We aim to keep up to date with the latest releases of the platforms you use. Hummingbird is now compatible with Unity 5.5 as well as with the older versions of the engine.

Onload event

The “onload” event is fired when the HTML document has loaded all resources – HTML DOM built, images, CSS, scripts. Use it to have custom code executed each time a new page is loaded. Once the event is triggered, it doesn’t happen again (even if something new is loaded) until the user navigates to a different page.

New version of the Coherent Editor – 1.5.3

The Coherent Editor empowers UI designers to create UI prototypes within hours. The latest version of the Editor contains a large number of fixes and enhancements. You can find the full list here.

Get a trial of Hummingbird 1.1 .

The post Hummingbird 1.1 is here! appeared first on .


12 principles of animation – Part 2 of 3

$
0
0

In this second part we will cover the next 4 principles:

5.Follow through and overlapping action

6.Slow in and slow out

7.Arc

8.Secondary action


Let’s start with number 5 which is

5 – Follow through and overlapping action

Follow through is a technique of having appendages drag behind the rest of the main shape. Overlapping action describe the offset between the timing of the main shape and the subsequent form.

In first rectangle I use the technic, in the second it’s just moving forward by Motion tween with constant speed.

Step 1 – Create a scene

Create a layer with a rectangle.

Step 2 – Animating

Star move and transform the rectangle Frame-by-Frame

animating frame by frame tutorialNote: Make sure onion skin is on.

Result:


6.Slow in and slow out

This principle refers to the way pretty much all movement start slowly, builds speed and finishes slowly.

Step 1- Create a car asset

car asset Adobe Animate tuorial

Step 2 – Animating

Set the end the animation to be on 2s by Insert Keyframe.

Add Classic Tween.


Move the car straight.

This is what we have right now. Its ok but it feels really mechanical. Lets apply this principle number 6 (Slow in and slow out ) to give the objects more life.

Step 3 – Add Easing

Properties panels-> Tweening-> Ease In Out-> Quad

Here is the result:

7.Arc

Everything in real-life typically moves in some type of arcing motion, and in animation you should adhere to this principle of arcs to ensure your animation is smooth and moves in a realistic way.


Step – 1 Create a scene

Create planet asset. Or export it from Adobe library.

Step 2 – Animating

Set the time of the animation around 3s. Create Motion tween.

animating planet tutorial

Drag the planet every 1s.

Here is the result:

As can you see it’s not really natural. But if we use the principle of arc things start look different.

Step 3 – Change the path

Chose Selection tool and curve the line.

change path Adobe Animate tutorialHere is the result:

planet animation

8.Secondary action

car animation

Secondary action refers to creating actions that emphasize or support the main action of the animation; it can breathe more life into an animation and create a more convincing performance.


Step 1 – Create a scene

Let’s create scene with two layers, car and suitcase.

Step 2 – Animating

Set the assets out of the artboards. Create Motion Tween on both of the layers. Then automatically will be set on the Timeline, second 1 to be the end of the animation.

Adobe Animate car motion tutorialMove both assets on the stage.

Continue the animation to 1,36s on both layers

On the layer suitcase Insert Keyframe->All on 25f

Step 3 – Add secondary action

Support the mane acton (car) with secondary action by moving suitcase further.

Move the suitcase out of the scene like is falling from 25f to 36f

car motion tutorialFinal result

This tutorial explains next 4 principles of 12 principles of animation by Ollie Johnston and Frank Thomas. The last part will cover last 4 principles which are Timing, Exaggeration, Solid drawing, Appeal. Stay tuned


The post 12 principles of animation – Part 2 of 3 appeared first on Coherent Labs.

12 principles of animation – Part 3 of 3

$
0
0

Disney’s Twelve Basic Principles of Animation were introduced by the Disney animators Ollie Johnston and Frank Thomas in their 1981 book The Illusion of Life: Disney Animation.

Though originally intended to apply to traditional, hand-drawn animation, the principles still have great relevance for today’s more prevalent computer animation and UI animation.

This tutorial walks you through the last 4 principles:

9.Timing

10.Exaggeration

11.Solid drawing

12.Appeal


9.Timing

rocket animation

Timing in animation is what gives objects and characters the illusion of moving within the laws of physics. Timing refers to the number of frames between two poses. For example, if a rocket travels from the bottom to the top, 24 frames would be the timing. It takes 24 frames or one second for the rocket to reach the top side of the screen. And it will look like:

But let’s change the timing to make it more realistic.

Step 1- Create a scene

Create a scene with a background and a rocket.

Step 2 – Animate Frame-by-Frame

Slowly move the rocket back and forth every 4f.

Firing the rocket by few frames moving up.

motion Adobe Animate

If you move an object too quickly or too slowly, it won’t be believable. Using the correct timing allows you to control the mood and the reaction of your characters and objects.

10.Exaggeration

exaggeration animation

Exaggeration is used to push movements further to add more appeal to an action. Exaggeration can also be used to create extremely cartoony movements or incorporated with a little more restrained to more realistic actions. Too much realism can ruin an animation, making it appear static and boring. Instead, add some exaggeration to your characters and objects to make them more dynamic.


Surprise impression:

But if we push movements further…

Step 1 – Animate

Start drawing animation Frame by Frame every 4s

frame by frame animation tutorial

Note: Make sure Onion skin is on. It helps a lot when the animation is Frame by Frame

onion skin Adobe Animate

11. Solid drawing

three dimensional animation

This principle is about making sure the forms feel like they are in three dimensional-space.

The solid drawing is about creating an accurate drawing with volume and weight, and thinking about balance, and the anatomy in a pose.


Step 1 – Create the square and change the scale

Draw a square and start animating it on 12f to look like transform from 2D dimensional space to 3D

Step 2 – Close the cube.

Create right side and bottom of the cube outside of the scene.

Create Motion tween on both of the layers and move them next to the front of the cube.

motion teen on layers

Add few lines around the cube for more interesting look.

principles of animation

12.Appeal

This principle can really come down to adding more appeal in many different areas of your animation. You can find areas of the character to push and exaggerate to create a more unique character design that will stick out in the audience’s memory.

There is a simple example:

Step 1 – Create asset

Create an asset in the form of a gift. Try to make it as realistic as you can.

Step 2- Change the scale

Select the asset ->Transform tool

Change the scale every 3f

Adobe Animate tutorial

Click on Selection tool and change the shape of the asset by dragging the corners of the gift.

Change the size of the ribbon to appeal the object and make it more interesting. Make it bigger:

present animation

Thank you for following our 3 part series covering the 12 Principles of Animation. We hoped you found the blog post useful and can implement some of the covered techniques in your work.

If you have any questions or would like to know more about design, ping @CPartaleva on Twitter! 

Useful Links:

https://en.wikipedia.org/wiki/12_basic_principles_of_animation

https://www.youtube.com/watch?v=uDqjIdI4bF4

https://www.creativebloq.com/advice/understand-the-12-principles-of-animation

https://helpx.adobe.com/animate/tutorials.html


The post 12 principles of animation – Part 3 of 3 appeared first on Coherent Labs.

Symbol Playback

$
0
0

In this tutorial, we will illustrate how to create a four-state button’s layout using Adobe Animate, export HTML markup and CSS styles with Coherent Exporter Add-on and show you how to control the playback of the button with Web Animations API.

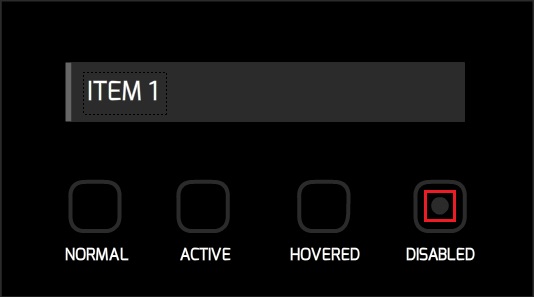
For design reference, we will use the four-state button, part of our Common Components Kit:

four-state button UI components

Create new scene

From the “File” menu choose “File/New”. From the window that opens select “Coherent Exporter GT (Custom)”:

extract UI to HTML Coherent Exporter

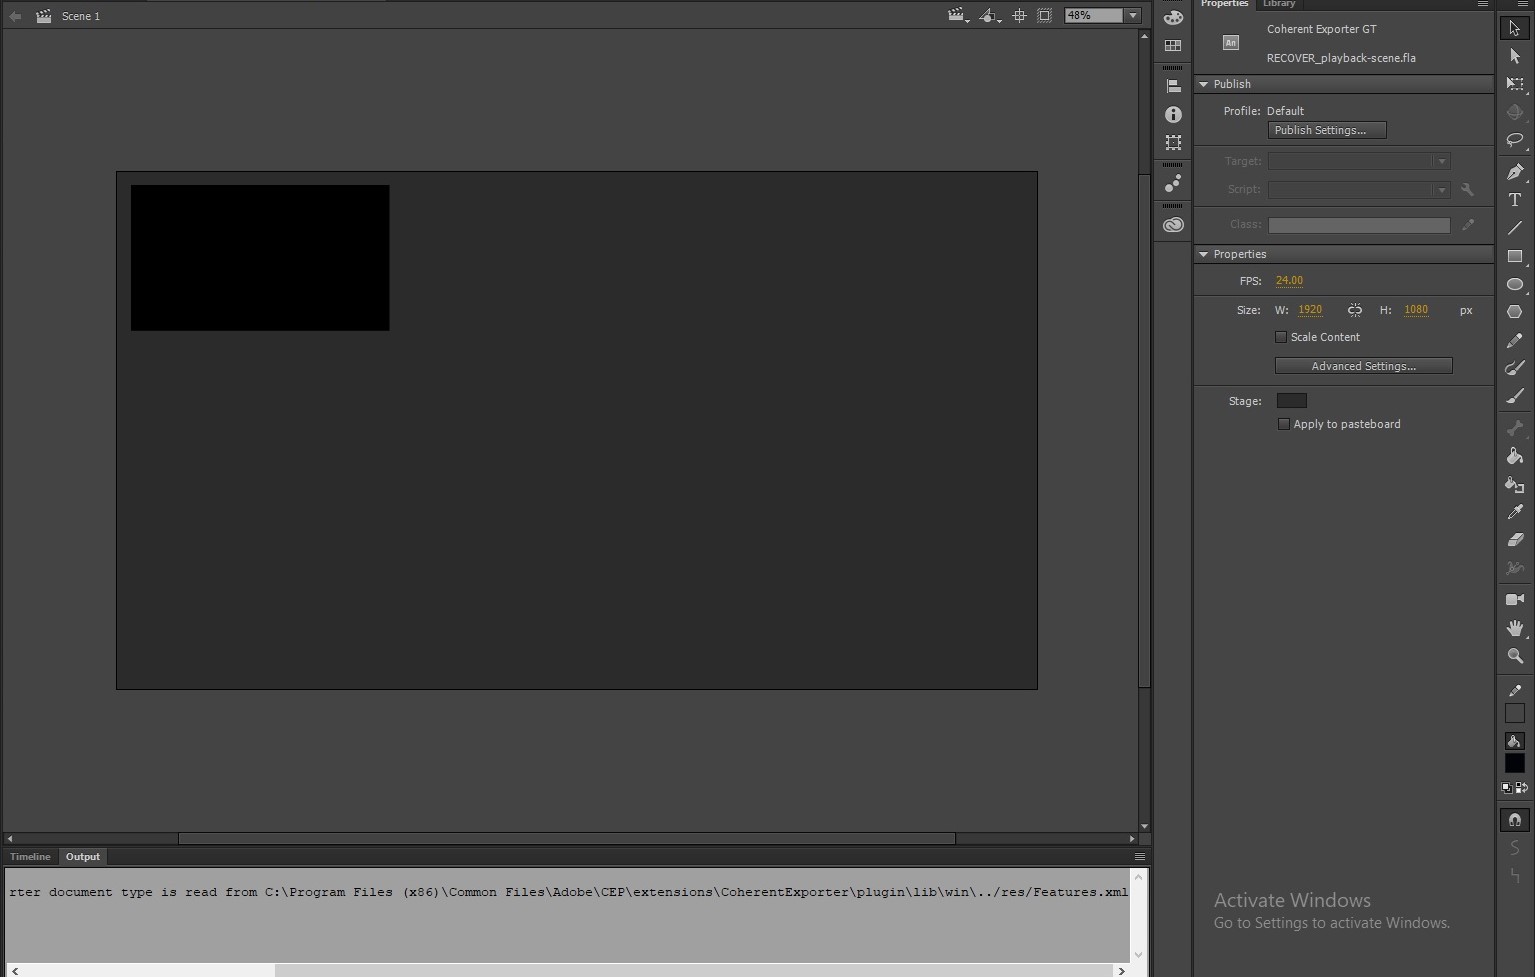
A new Scene opens. From the Properties menu on the right side of the window, enter width and height of the Scene (we will use 1920px by 1080px). You can also set the background color of the scene from the Stage’s color picker (we will use #2B2B2B).

Arrange the layout

First of all, let’s create the background of our button. Select the Rectangle Tool and set its characteristics:

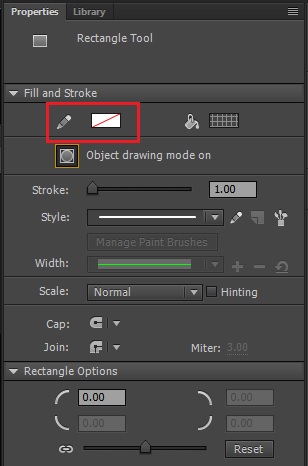
  • from properties menu, set the stroke color to none

exporting UI Adobe Animate

We are removing the stroke, because the Exporter will create extra elements for the border of the element, in that case, we don’t need it.

  • choose black fill for the rectangle

Adobe Animate color palette

  • create a rectangle as in the reference image below (540px by 300px)

exporting UI Adobe Animate tutorial

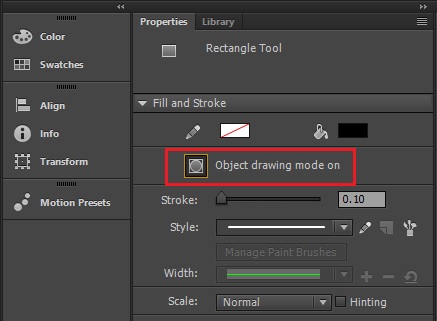
Note: When you are crafting geometric shapes, make sure the Object drawing mode on is active. If this mode is off, the shapes will be overlaid and when you attempt to move them they will tear.

Adobe Animate tutorial

  • create the four states shapes of the button

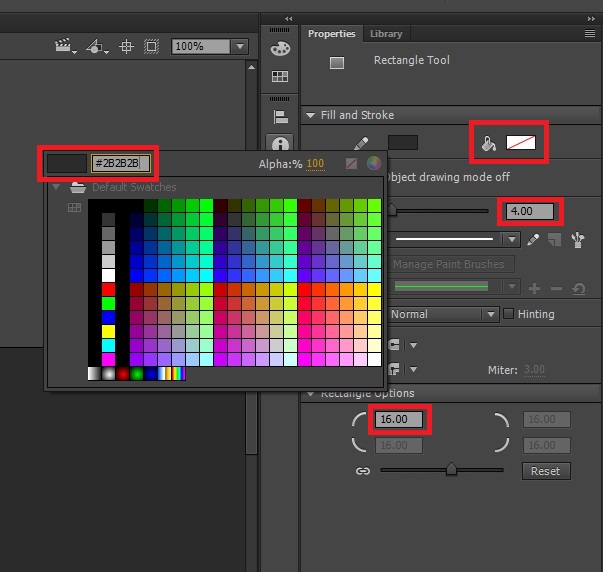
Select the Rectangle Tool again and set the following properties: choose 4.00 units for the width of the stroke, the color of the stroke will be #2B2B2B, then remove the Fill of the rectangle. In the Rectangle Options field choose 16.00 units, this feature is responsible for the border radius of the shape of our states. The image below shows these settings:

creating button Adobe Animate tutorial

Now craft the state button shape with width and height 50px by 50px.

You can duplicate this shape, by selecting it with the Select Tool (shortcut: V) and copy/paste it three times (shortcuts: Ctrl + C and Ctrl + V). Now arrange the shapes to match the reference image:

  • add text for the states

Choose the Text Tool from Properties menu, set its Family to a font of your choice, in this sample we use Exo font, set the size of the text to 16.0pt and the color to #FFFFFF. Type the following under every state shape:

four-state button tutorial

  • create the button

With the techniques we’ve created the elements above, craft the button to match the reference image:

four-state button UI tutorial

Now we’ve created the background of the four-state button, which will remain static. The rest of the elements will be animatable which require different techniques.

Create the animations

In order to add animations to the elements, we have to create a separate Layer for each element, convert it to Symbol and add an Animation Tween. To make the elements appear and disappear we will change their Alpha value at sequence time intervals.

Note: In Adobe Animate one second is equivalent to 24 frames by default. We will animate each of the four states of the button for one second, so the whole animation’s duration will last 96 frames.

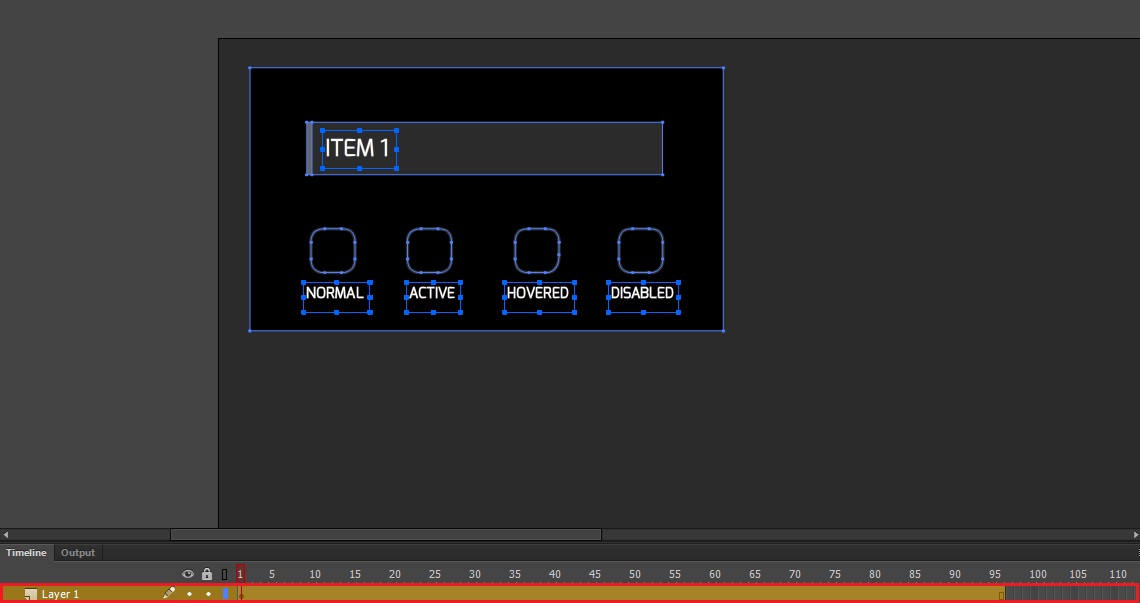
As you can see Adobe Animate has already created a Layer 1 by default. It holds our button’s background. We have to add 96 empty frames to this Layer which will preserve the background static, during the animations. In order to do that right click the 96th frame and select Insert Frame:

four-state button Adobe Animate tutorial

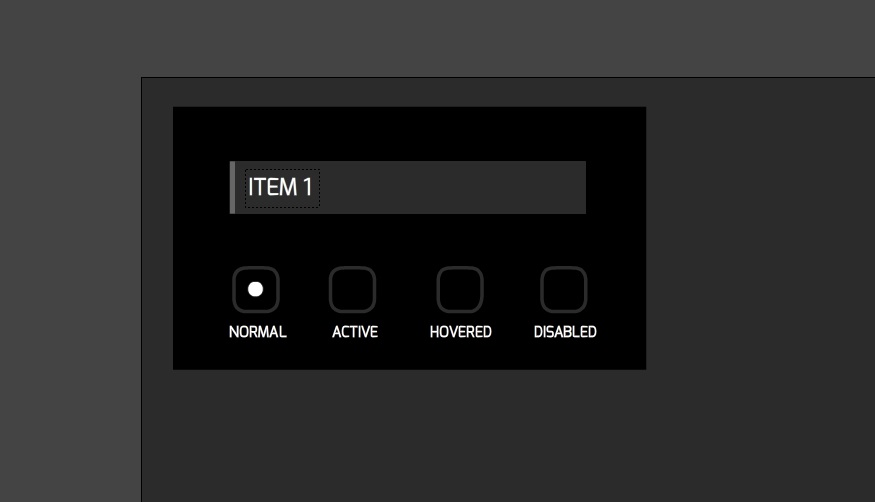
Now create a new Layer for the normal state of the button, this is the white dot in the center of the first rectangle. While you are in this Layer, craft a circle as in the reference image (d=18px):

four-state button layer

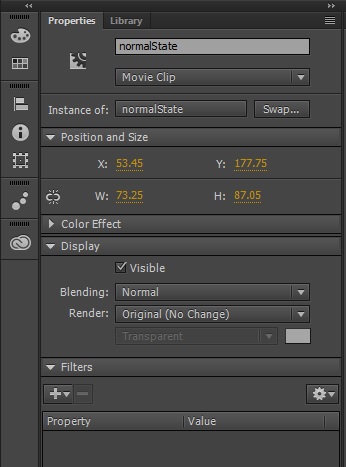
Select the circle, right click on it and choose Convert to Symbol option, in the window that appears add a Symbol name – normalState. From the properties menu, give it an instance name too.

convert to symbol Adobe Animate

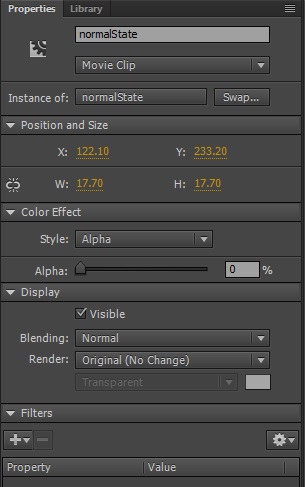
In order to animate the Symbol, add a Мotion Тween (right click on the Symbol and select Create Motion Tween). This will create 24 frames by default. Now let’s animate the Alpha value of the Symbol. At the beginning of the animation this value will be 0%. Navigate the Timeline’s playhead to the first frame. From the properties menu set the Alpha value to 0%:

Navigate the playhead to the 8th frame and change the opacity of the element to 100%. On the 18th frame, the opacity should stay 100%. At the end of the motion tween (the 24th frame), set the Alpha value again to 0%. You can quickly preview your animation by “scrubbing” the red playhead back and forth on the Timeline or click on the play button at the bottom of the Timeline.

With the techniques we’ve created the normal state symbol and its animations, create the following Layers (highlighted with red), convert them to Symbols and add Motion Tweens:

  • the active state:

active four-state button UI

  • the active state indicator

UI button tutorial

  • the hovered state:

UI button hovered state

  • the hovered state indicator

UI hovered state indicator

  • the disabled state:

button disabled state

In the Timeline create the following animations changing the Alpha values from 0% to 100% of the elements:

UI timeline Adobe Animate

Publish and preview

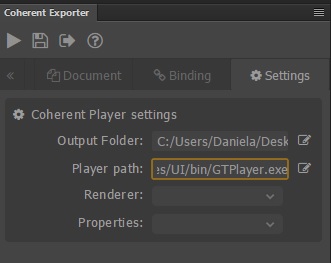
From the Coherent Exporter menu, go to Settings and navigate the Player path to the folder where your GT Player is. For Output Folder choose your working directory.

exporting UI to HTML

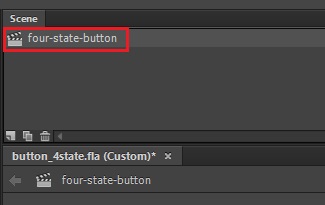
Click on the Publish then Preview button, a CoherentGT Player will appear with the four-state button. Check out your working directory. Coherent Exporter has created a folder with CSS styles, another one for images (when there are complex shapes, Exporter converts them to SVGs) and published the markup in Scene_1.html. You can change the name of the exported HTML by renaming the Scene, from the Animate’s Window drop-down menu select Scene and type a name of your choice:

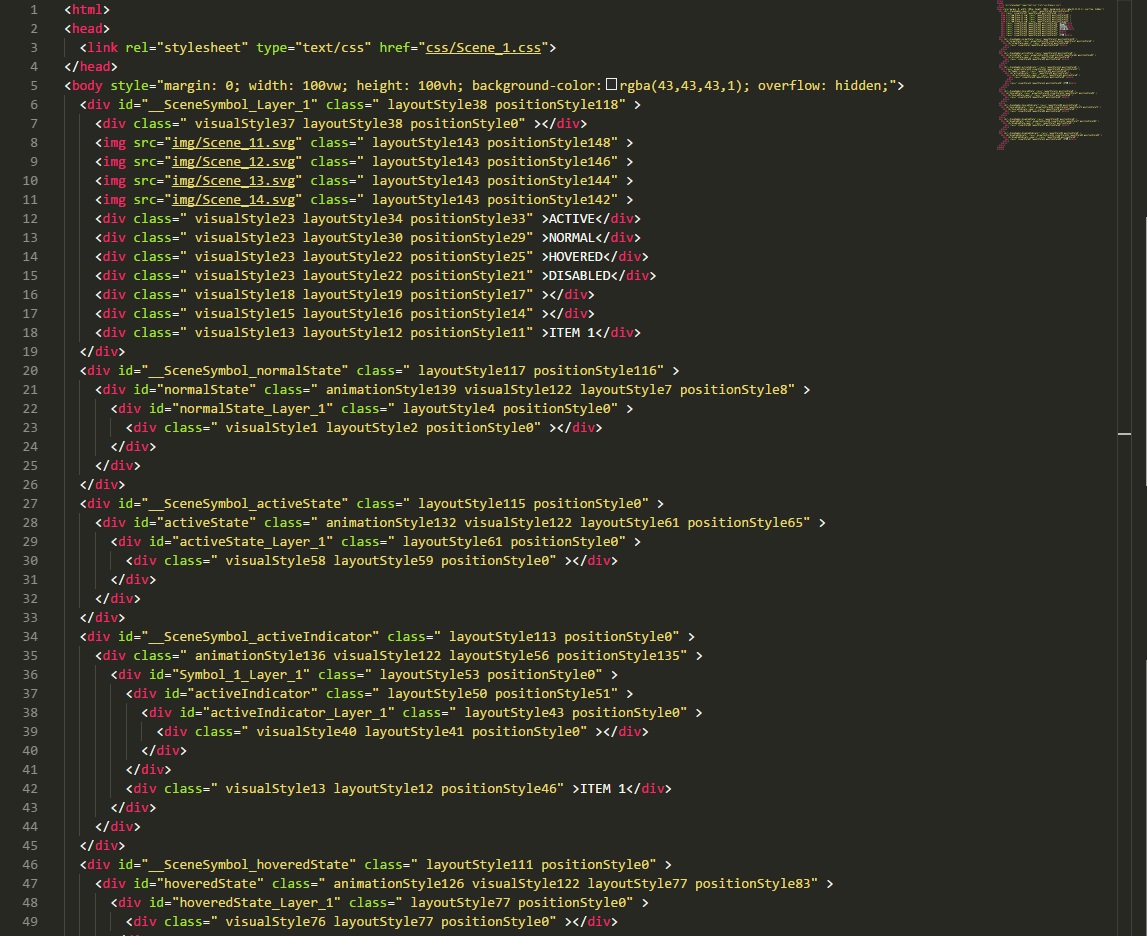
Let’s look at the markup:

The DOM elements are nested correctly. The IDs for the elements are our Symbol’s names, also there are some classes that the Exporter has generated. The classes that start with visualStyle are responsible for the visual CSS properties like colorfont-sizefont-family etc., those with layoutStyle – for the element’s width and height, those with position – for the element’s position.

Add the JavaScript code

Thanks to the Exporter, you can add custom JavaScript files that allow you to create interactions that are not possible with the Timeline alone.

Note: In order to take advantage of the Web Animation API’s power, we will use the WAAPI polyfill. Here is the link to download the library, then include it in your project.

Go to Document tab of the Coherent Exporter menu and add web-animations.min.js and web-animations-next.min.js files. In your working directory, create a new folder with a JavaScript file that will hold the code which will control the animation of the four-state button:

Coherent Exporter User Interface HTML

Add the following code to your custom JavaScript file:

var normalState = document.querySelector("#normalState");
var activeState = document.querySelector("#activeState");
var activeStateIndicator = document.querySelector("#activeIndicator");
var hoveredState = document.querySelector("#hoveredState");
var hoveredStateIndicator = document.querySelector("#hoveredIndicator");
var disabledState = document.querySelector("#disabledState");

normalState.classList.remove("animationStyle124");
activeState.classList.remove("animationStyle117");
activeStateIndicator.classList.remove("animationStyle121");
hoveredState.classList.remove("animationStyle111");
hoveredStateIndicator.classList.remove("animationStyle114");
disabledState.classList.remove("animationStyle108");

var keyframes = [
  { opacity: 0 },
  { opacity: 1 },
  { opacity: 1 },
  { opacity: 0 }
]

var normalAnimation = normalState.animate(
  keyframes, {
  duration: 1000,
  delay: 1000,
  iterations: Infinity
});

var activeAnimation = activeState.animate(
  keyframes, {
  duration: 1000,
  delay: 2000,
  iterations: Infinity
});

var activeIndicatorAnimation = activeStateIndicator.animate(
  keyframes, {
  duration: 1000,
  delay: 2000,
  iterations: Infinity
})

var hoveredAnimation = hoveredState.animate(
  keyframes, {
  duration: 1000,
  delay: 3000,
  iterations: Infinity
});

var hoveredIndicatorAnimation = hoveredStateIndicator.animate(
  keyframes, {
  duration: 1000,
  delay: 3000,
  iterations: Infinity
});

var disabledAnimation = disabledState.animate(
  keyframes, {
  duration: 1000,
  delay: 4000,
  iterations: Infinity
});

document.querySelector('.visualStyle37').addEventListener('mouseover', function() {
  normalAnimation.pause();
  activeAnimation.pause();
  activeIndicatorAnimation.pause();
  hoveredAnimation.pause();
  hoveredIndicatorAnimation.pause();
  disabledAnimation.pause();
});

document.querySelector('.visualStyle37').addEventListener('mouseout', function() {
  normalAnimation.play();
  activeAnimation.play();
  activeIndicatorAnimation.play();
  hoveredAnimation.play();
  hoveredIndicatorAnimation.play();
  disabledAnimation.play();
});

document.body.addEventListener('click', function() {
  normalAnimation.playbackRate = 1.8;
  activeAnimation.playbackRate = 1.8;
  activeIndicatorAnimation = 1.8;
  hoveredAnimation.playbackRate = 1.8;
  hoveredIndicatorAnimation = 1.8;
  disabledAnimation.playbackRate = 1.8;
});

Now publish and preview the Scene, the code above allows you to pause the four-state button’s animation by hovering on it, when removing the mouse cursor, you will play the animation again. You can speed up the animations by clicking on the document’s body.

The post Symbol Playback appeared first on Coherent Labs.

Hummingbird 1.9 released!

$
0
0

This release we focused on improving how Hummingbird behaves when you get it out of the box and start experimenting across various platforms.

Talking about various platforms, Hummingbird now supports Universal Windows Platform!

To see everything included in the new release, check out the full Changelog.

Measure performance on more platforms

In 1.8 we added support for the Performance panel of the dev tools. The dev tools themselves, however, were only available on Windows and Android.

1.9 solves that problem by allowing you to connect to the dev tools on consoles, as well. With the new release PlayStation 4, Xbox One and UWP are all supported.

Enhancing our tools & samples

We are focusing on improving the way you use the technology and for this reason, we are adding some quality of life additions in this release and in a couple of upcoming versions.

Starting from 1.9, you’ll be able to preview your UI even faster by just drag and dropping the HTML file in the HB Player!

Additionally, our C++ samples were somewhat convoluted with code that didn’t directly help you understand how to integrate HB in your engine. This release arrives with a new sample framework that allowed us to separate some feature-specific code into independent sample projects that focus on only this particular feature.

We’ve prepared even more enhancements to our tools in 1.10 and a bunch of new examples. Here’s a small teaser:

Stay tuned for Hummingbird’s next release… let’s just say that some more platform support is coming your way.

Until then, follow me @NikolaDimitroff to know what I get up to.

The post Hummingbird 1.9 released! appeared first on Coherent Labs.

How to use After Effects for Game UI

$
0
0

How to use After Effects for Game UI

Adobe After Effects is undoubtedly the world leading solution for Motion graphics and Special FX. From movies through television to game studios it is the go-to tool for a great range of tasks – keying, composing, tracking (to name a few). Furthermore it has a huge and very active community as well as a great ecosystem of third-party plugins.

In this tutorial, I’ll show you how you can use After Effects to recreate the special FXs in the Mission select screen of our FPS Kit.

FPS UI Coherent Kits

There are 3 Major steps:

1. FX authoring
2. Assets export
3. CSS animations

Please note that this tutorial assumes that you are at least intermediate user of the Adobe After Effects. If you are new to the product I recommend you check out the official getting started tutorials before continuing.

1. FX authoring

The first step is to create the actual effect. Wе’ll start with a png image with a transparent background which would give us the shape for the effect. One way to get it is to use auto-trace (Layer/Auto-trace) which automatically takes the outline of the layer and creates a mask from it.

UI FX authoring

Then you need to create a new solid layer and paste the mask. To copy the mask from layer to layer simply select the mask lane and press ctrl+c. Then select the other layer and press ctrl+v. (Tip: if you want to resize the mask you can activate the free transform from Layer/Mask and Shape path/Free transform points.

After Effects UI

Now that we have the shape let’s add the actual effect. This could be done with the built-in tools of After Effects but it’s far easier with an awesome free plugin called Saber from videocopilot –  After you’ve installed it just search for it in the effects panel and drag and drop it to the solid layer.

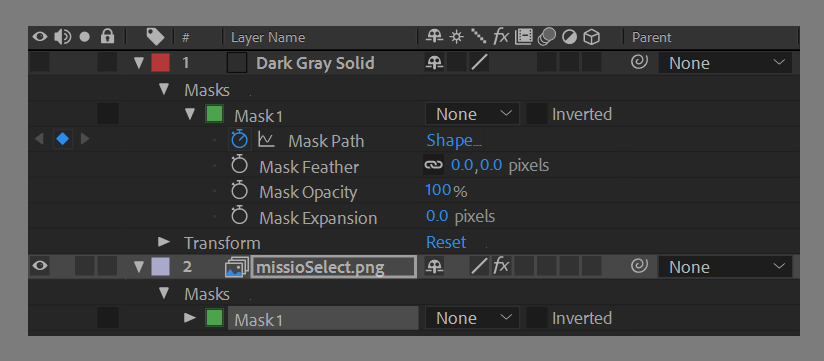
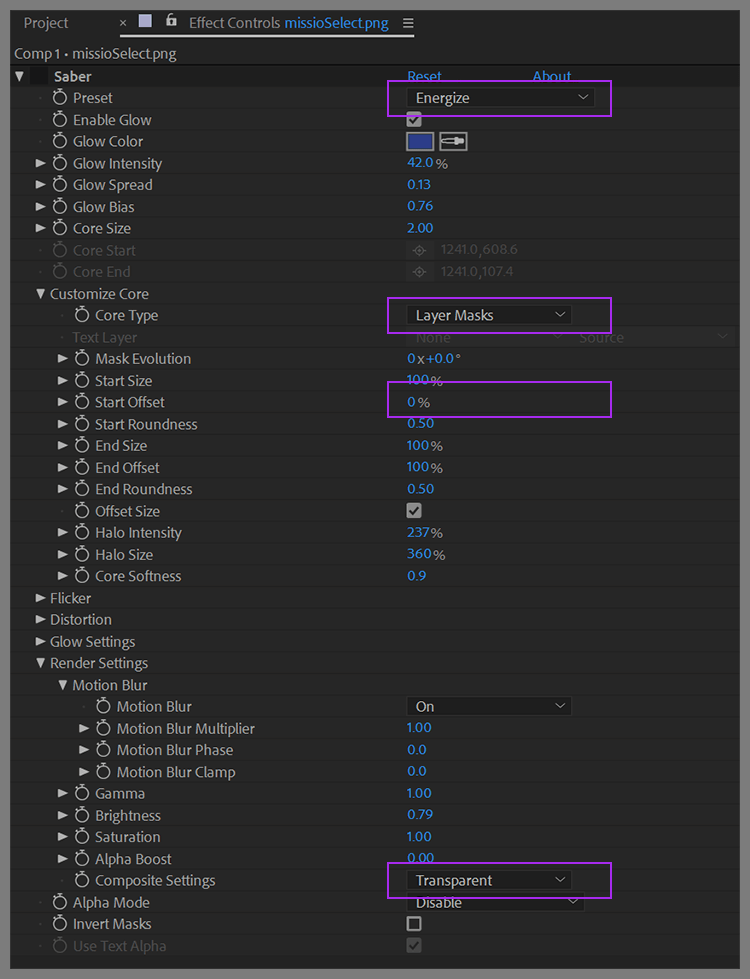
Saber settings A few important settings that need to be specified in the Effect controls panel:
customize core – core type – Layer masks (this makes the effect follow the shape of the mask that we previously created)
composite setting – transparent (this makes the actual transparent background)

After Effects UI menu settings

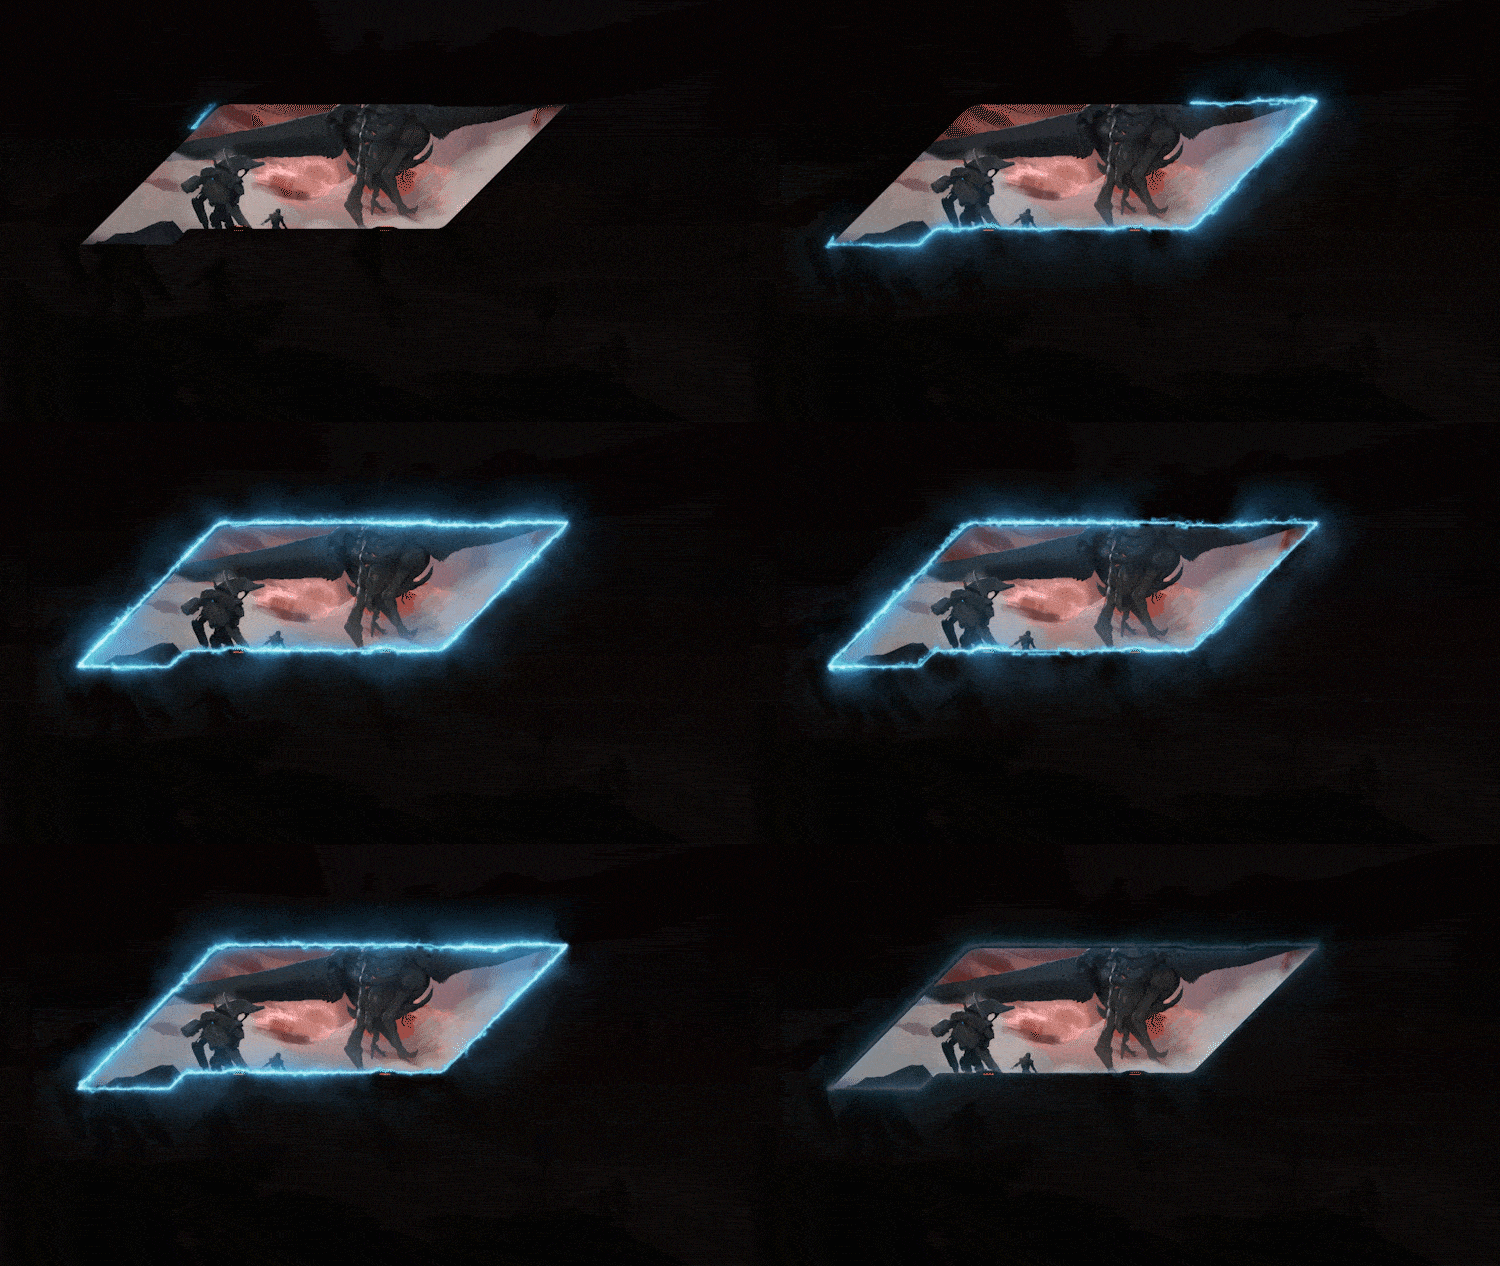
Then we can play with the rest of the settings to get the desired end effect. In this case, we are using the “energize” preset and animation of the Start offset setting. And here’s the finished effect!

FX user interface example

2. Assets export

Once we have completed the effect we need to export it from After Effects. There are two major options – spritesheet or transparent video. The video is pretty straightforward (here’s a tutorial just in case) so we’ll focus on the spritesheet. Basically, we would want to create a flipbook animation through the spritesheet in which each of the sprites is a frame of the effect. To get that we can either export the frames as a series of pngs and arrange them in Photoshop or used an a plugin called sheetah.

In both cases, the end result should be something like that – a single image with rows/columns of individual frames.

FX assets export

3. CSS animations

Now we just need to make the animation happen in the actual UI of the game. This part is typically carried out by UI developers but It’s actually quite simple. We can use the background-position CSS property to navigate along x/y axis of the spritesheet. Then we just need to add a steps animations so that the animation “snaps” from one position to another in the spritesheet. The number of steps depends on the number of frames in the columns/rows of the actual spritesheet.

Here’s the complete CSS (btw the spritesheet is also responsive)

.element {
width: 100%;
height: 100%;
background-image: url("spritesheet.png");
background-size: 1200% 800%;
animation: playX 0.504s steps(12) infinite, playY 4.032s steps(8) infinite;
}

@keyframes playX {
0% { background-position-x: 0%; }
100% { background-position-x: -1200%; }
}

@keyframes playY {
0% { background-position-y: 0%; }
100% { background-position-y: -800%; }
}

I hope you enjoyed this tutorial and you’ll use it to create a bunch of awesome special FX for you games! Tag us on Twitter so we can see your work or if yоu just want to chat!

Hristo

The post How to use After Effects for Game UI appeared first on Coherent Labs.

What you need to know about Hummingbird’s support for Nintendo Switch

$
0
0

As of 24th of April 2018 Coherent Labs is the only UI solution on the market that has the privilege of supporting Nintendo Switch™. We have been wanting to say that for a while now!

The communication between the two teams – Nintendo & Coherent Labs – started back in December of last year and has been going without a hitch to this day, when we can officially offer our SDK for Nintendo to clients.

Fully multiplatform UI solution

From a business perspective, adding Nintendo Switch to our portfolio means our clients can now enjoy the workflow and performance benefits of the leading UI tool on the last platform they couldn’t. That makes the lives of our sales team much, much easier as there is virtually nothing left we can’t offer to our clients at this point.

Being the most popular UI solution used for games with the widest variety of platform support we were eager to add Nintendo Switch to the list, as it was the last major platform missing from our portfolio. If you are wondering how this whole ordeal started, it’s quite simple – we got a request from a prospective client whose game was to be developed for Nintendo Switch. The next step was to get in touch with the Nintendo team and see what needed to be done to make this platform support become a reality.

Eager to know which is the game that made us go through this whole ordeal? Stay tuned and you will find out. For now, however, let us tell you a bit about the technical challenges we encountered while integrating Hummingbird.

Integrating Hummingbird with Nintendo Switch

Hummingbird’s core code is lean, mean and platform-independent. Porting it to almost any platform takes as little time as adding the new platform to our build system. That’s not as true when speaking about our one and only major dependency – the JS VM.

For Nintendo Switch specifically we are using JavaScriptCore, although we are looking into moving to ChakraCore later in the year, but nothing is solid as of yet. Porting JSC took most of our time in the process. The worst offenders being getting CMake to play well with the build system of Nintendo Switch and forcing all JSC’s internal tools to generate relevant code. Everything else was smooth sailing so congrats to Nintendo for the amazing transition experience.

But there’s another reason we love getting our hands on new technologies – new compilers and tools are a great way for validating that we are heading in the right direction. We are users as well as developers of our own product and have integrated the core SDK into engines like UE4 and Unity3D. We also have a dedicated team creating UI kits (which you’ll finally get to enjoy in HB 1.10). Yet, how easy it is to best integrate our code into a new tech is always a good test. Even better, new hardware means more options for us to check how our architecture performs. How does the task system perform on it? Does the new compiler find warnings in our code that the others didn’t? Does the graphics API fit our rendering subsystem?

The answer to all of those was a resounding success. HB runs at submillisecond speeds in our FPS kit:

With adding platform support for Universal Windows Platform and now Nintendo Switch, Hummingbird became a fully multiplatform UI solution. Now it is adequate to say that we will shift our focus to expanding Hummingbird’s features, so keep an eye on our Blog for more news.

In the meantime, are you planning on developing something for Nintendo Switch soon?

© 2017 Nintendo. Nintendo Switch and Joy-Con are trademarks of Nintendo.

The post What you need to know about Hummingbird’s support for Nintendo Switch appeared first on Coherent Labs.

Hummingbird 1.10 released!

$
0
0

My job here at Coherent Labs involves a lot of things, but hands down, the best part about it is getting to make pretty GIFs of features the team did and brag about it. So sit back and indulge in the next series of pretty GIFs showcasing our amazing work. I hereby name this release Hummingbird ‘More’!

An easier start with Hummingbird!

In an attempt to make getting started with Hummingbird easier, we now have a launcher:

It has just one goal – to improve the way you interact with the library. Whether it’s your first time using HB & you just want to see what it’s capable of doing:

Or figure out how to integrate it in your engine / see how it works in UE4:

We’ve also updated the Hummingbird Player to make its possibilities obvious:

If you’d like to see something we missed in either of the tools, don’t hesitate to send us your feedback, we want you to have the best development experience possible and your feedback is the shortest way to it!

More dev tools!

Our quest for extending the dev tools continues! The HTML tree and each element’s styles are now inspectable from the ‘Elements’ panel in our dev tools. Note that since full support for this panel is a huge task, we are now only bringing you read-only access and you won’t be able to modify neither the tree nor the styles until HB 1.11.

More colors!

Is there something prettier than gradients? Sure – animated gradients!

More platforms!

Just when I thought there couldn’t possibly be any hardware platform Hummingbird doesn’t support, you guys demand more and more you shall receive! This release lowers our minimal Android requirement to 4.2 and adds 32-bit UWP support. Also, did you know we added support for Nintendo Switch?

The post Hummingbird 1.10 released! appeared first on Coherent Labs.


How to use TypeScript for Game UI?

$
0
0

What is TypeScript?

TypeScript overview
Overview

By definition, “TypeScript is JavaScript for application-scale development”.
TypeScript is a strongly typed, object oriented, open-source compiled programming language.
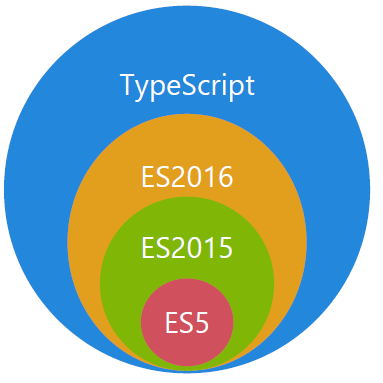
It was developed and maintained by Microsoft. It is both a language and a set of tools. A typed superset of JavaScript which means any Javascript code is valid TypeScript, but TypeScript adds type safety. In other words, TypeScript is JavaScript plus some additional enhancements.

TypeScript in game UI tutorial

Features of TypeScript

TypeScript adopts the basic building blocks of your program from JavaScript, so you only need to know JavaScript if you want to develop applications with TypeScript. It also supports all of the existing JS libraries and Frameworks. Consider everything it’s super portable across browsers, devices, and operating systems.

Environment Setup

As we mentioned, TypeScript is an open-source technology, so it can run on any browser. All you need to develop TypeScript application is a TypeScript Compiler and a Text Editor. We’ll guide you through the process of creating your first TypeScript application. Just follow the steps bellow.

Step 1:

Download and install Node.JS!

Step 2:

Install the TypeScript Compiler. Afterwards, open a terminal window and type:

npm install -g typescript

Step 3:

Now that we have everything needed, it is time to open any text editor and create a file with a filename extension .ts.

Let’s create a file with the name greetings.ts and write a simple Greeting example.

let firstName: string = "John";
let secondName: string = "Smith";

function showGreetings(firstName: string, secondName: string){
  return "Greetings: " + firstName + " " + secondName;
}
document.body.innerHTML = showGreetings(firstName,secondName);

Afterwards, save the file.

Step 4:

Open the terminal window in the folder where you saved the file and type :

 tsc greetings.ts

The compiler will convert greetings.ts and create a new JS file greetings.js in the same folder.
When you open the JS file you will see our code is converted to:

var firstName = "John";
var secondName = "Smith";
function showGreetings(firstName, secondName) {
  return "Greetings: " + firstName + " " + secondName;
}
document.body.innerHTML = showGreetings(firstName, secondName);

Tip: Whenever you need to perform some quick experimentation with how TypeScript code would be converted to JavaScript, it’s not necessary to go through the whole process. There is an online TypeScript converter which you can find here.

By default, the compiler compiles TypeScript files to ES3, but you can easily change that. Simply add  --target es6 after the tsc command and the compiler will comply TS files to ES6.

Step 5:

Although it’s very easy to convert files with the tsc command, it is not necessary to do this every single time.

There is a build-in function in the Compiler that can watch our file for changes and automatically recompiles the file.

Simply type in the command line:

tsc --watch --outFile greetings.js greetings.ts

and you’re done!
As you can probably guess there are more compiler’s options which you can check here.

Embedding TypeScript in your HTML page

We think you already know how to embed TypeScript in your HTML page, because actually we are going to use our converted JS file greetings.js. The last thing we need to do is to include the greetings.js inside a script tag in our HTML page.

<script src="greetings.js"></script>

Open your HTML page and Voalá!

Conclusion

TypeScript gives us a lot of benefits to our productivity and develop experience. We have already seen that it is very easy to use TypeScript to better our workflow and simply including the generated JavaScript file in the HTML page. It gives us a protection with its strongly typed rules, also it allows developers to create and maintain sustainable and scalable applications. Considering everything, TypeScript was created to complement and enhance JavaScript.

Good reads:

Introduction to TypeScript by Todd Motto
Learn TypeScript in 30 Minutes
TypeScript Tutorial for Beginners
Configuring TypeScript compiler

The post How to use TypeScript for Game UI? appeared first on Coherent Labs.

Introducing Coherent Console Fonts

$
0
0


Coherent consoles icons fonts

As most of you know, icon fonts are font files that are filled with icons and graphs instead of letters or numbers. Many of you are using some type of similar fonts in their daily work-related tasks. Icon fonts are not just a modern way of using iconography bur rather a way to communicate information in a more efficient way to the user.

That’s why we are happy to introduce to you one of our new features in Hummingbird – The Coherent Console Fonts.

Coherent Console Fonts is a bundle of fonts created especially with the purpose to make using control signification in the games much easier for the designers and developers.

Each one of the Coherent Fonts represent the main control buttons from the console’s controller. There are three available fonts – one for each of the biggest names on the market – PlayStation, Xbox & Nintendo Switch.

console buttons icons

Coherent Console Fonts save you time from creating custom control icons for every different project. You’re able to apply different text effects on them every time you need to spice up the look. Another great advantage is that the size of Coherent Console Fonts can be changed in a few minutes, and there is zero need for Photoshop to do that. Our icon font characters are vectors – meaning they look well even in high pixel-density displays. At last but not least, when using Coherent Console Fonts, your files will be lighter in size resulting in faster UI loading, which can’t be achieved when using regular SVG or PNG icons.

Xbox buttons icons fonts


Xbox button icon

All the fonts can be used in most of your apps which are installed onto your computer. But mainly the fonts are designed to be used in Adobe Animated and Hummingbird.

To use Coherent Console Fonts you have to instal them first. In the screenshots down below you’ll be able to find how to do that if you’re using Windows 10 or MacOS.

To install Coherent Console Fonts on Windows 10, select the files, then right click on them and select “Install”…and you are done!

installing Coherent Fonts

To install Coherent Console Fonts on MacOS, open Font Book, then drag and drop the files into the app. You’re done.

Installing Coherent Console Icons

Coherent Console Fonts will be available soon.

The post Introducing Coherent Console Fonts appeared first on Coherent Labs.

Modular design in game UI

$
0
0

In this blog post, we will illustrate how to distribute a complex UI in several UI-specific widgets, placed in different .fla files and automatically updating them in one master .fla file.

Benefits of distributed UI workflow

Dividing a complex UI into smaller simpler widgets provides better organizational project structure. The workflow also allows several front-end developers and designers to work on the same UI simultaneously and independently, which improves the collaboration among the team members and consumes less development time.

Symbols from different files

Adobe Animate allows us to distribute UI widgets from one .fla file to another. In order to share a widget among external .fla files, its content must be wrapped in a Symbol. Linking the original Symbol to the one that is distributed, provides a possibility to edit and update both in real time.

Modular design usage in game UI

Let’s see how the modular UI workflow can be applied in a real project. For the demo, we will use our Simulator Kit:


flight Simulator UI kit

The sample consists of three widgets: Altitude Indicator, Flat Panel Display, and Head-up Display, that are composed in a scene with a mock background image of a Boeing Cockpit. In our case, the Cockpit scene will represent the master file into which we will link the rest of the widgets.

So, we have three different .fla files for each of the screen’s widgets:

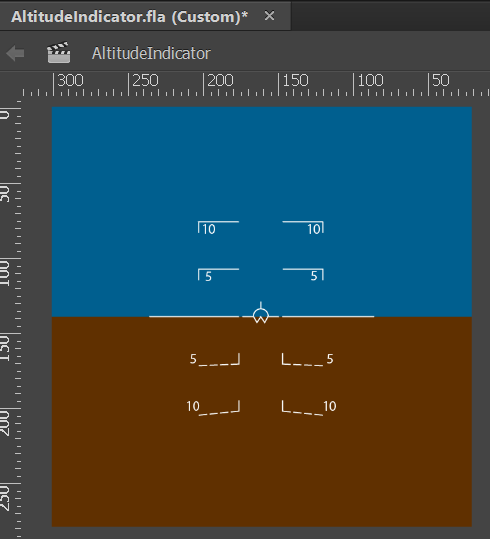
Altitude Indicator:

UI altitude indicator

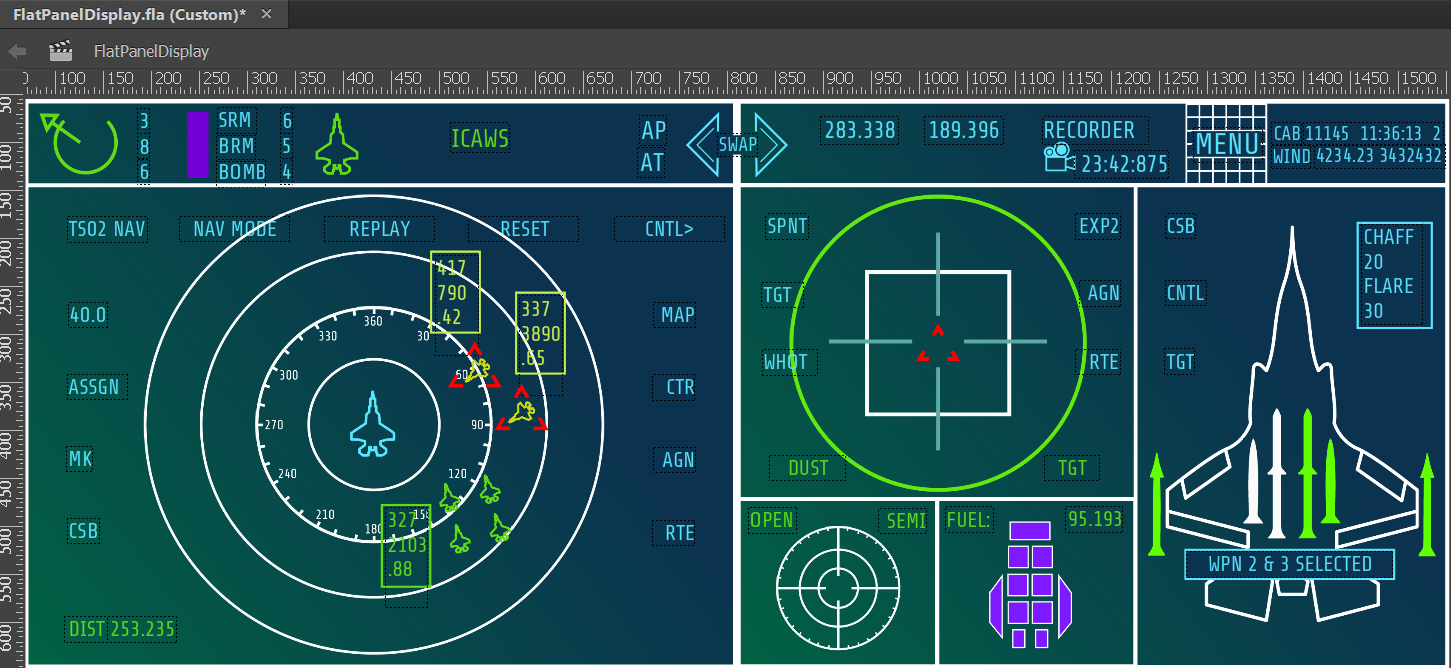
Flat Panel Display:

UI Flat Panel Display

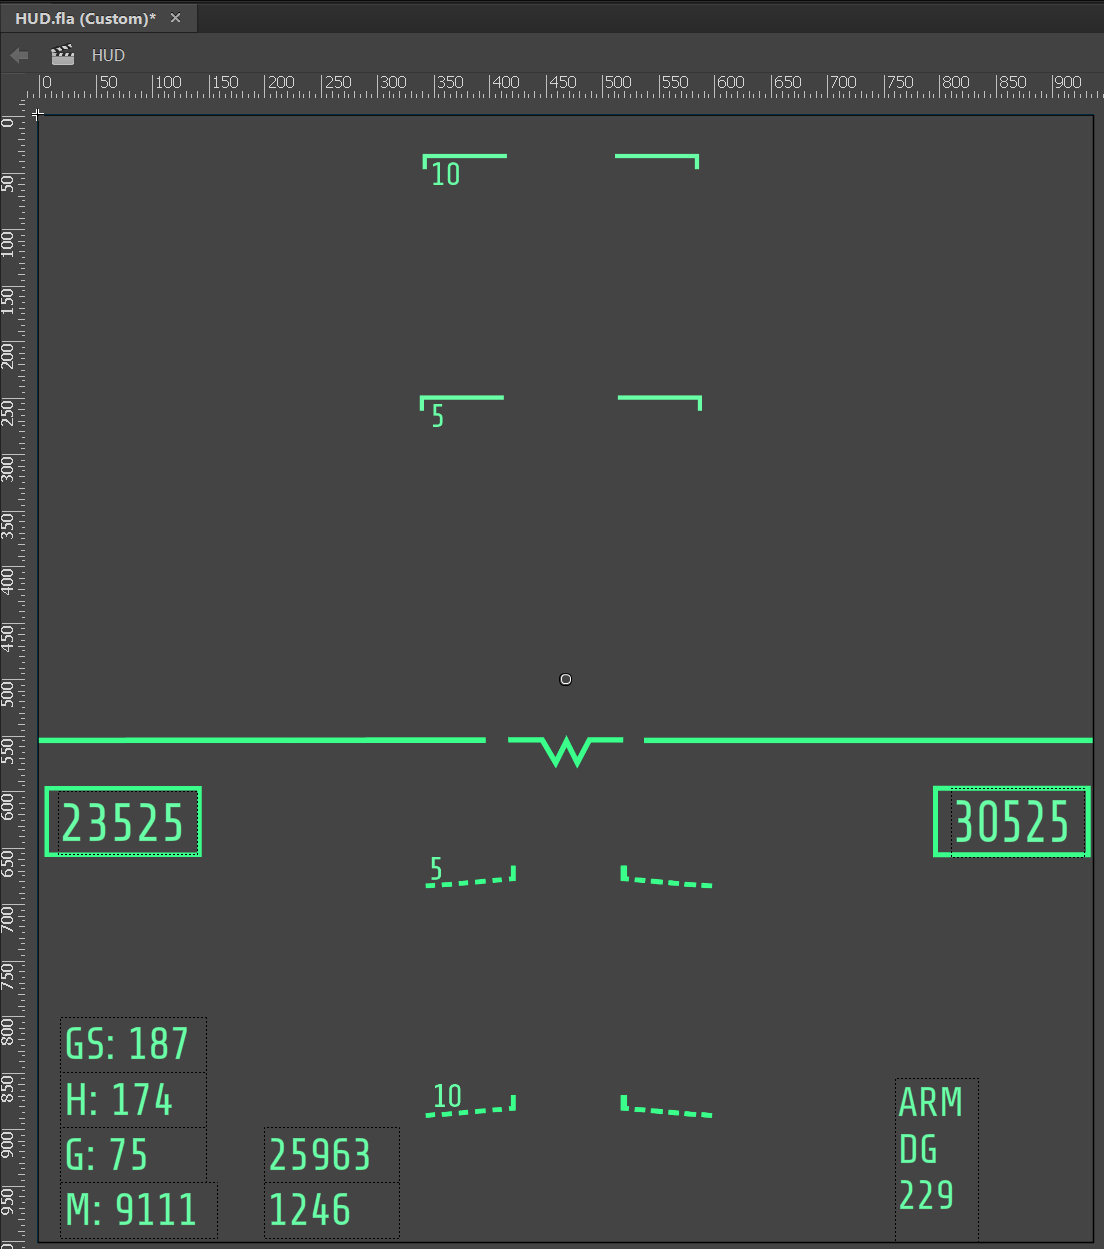
Head-up Display:

flight simulator HUD

In order to link the separate UI modules into one master file, we have to open them in Adobe Animate. Now create a new .fla file, name it master.fla and place the cockpit’s image as a background:

flight simulator UI

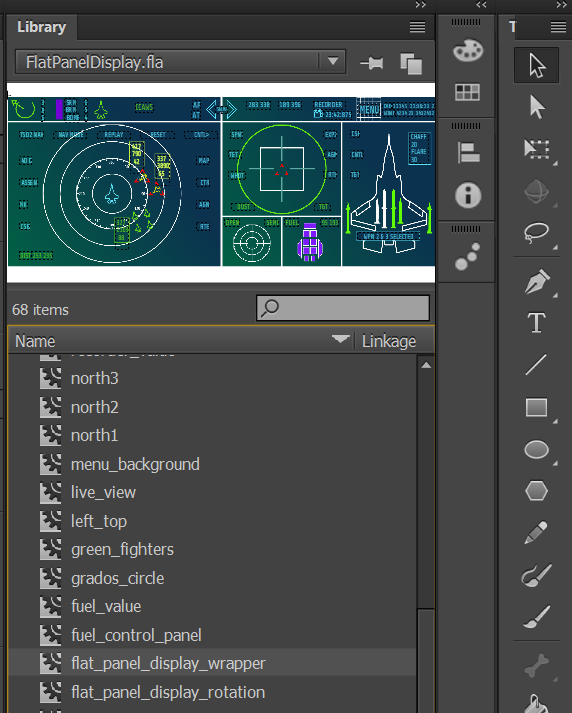
Go to the Library panel and from the drop-down menu choose the file where the Symbol you want to add is, then choose that Symbol and drag and drop it in. For example, I want to drop in the flat_panel_display_wrapper Symbol that is placed in the FlatPanelDisplay.fla:

modular UI design fpd drop in

Do the same with the rest of the two Symbols. Then from the Library drop-down menu choose the master file and save it.

Now we have to link the dropped Symbols to their .fla files, thus when we edit each of the individual widgets, the changes will reflect the master file. Right-click on the Flat Panel Display and choose Show In Library. This will highlight the Symbol in the library. Right-click and select Properties:

modular UI design properties

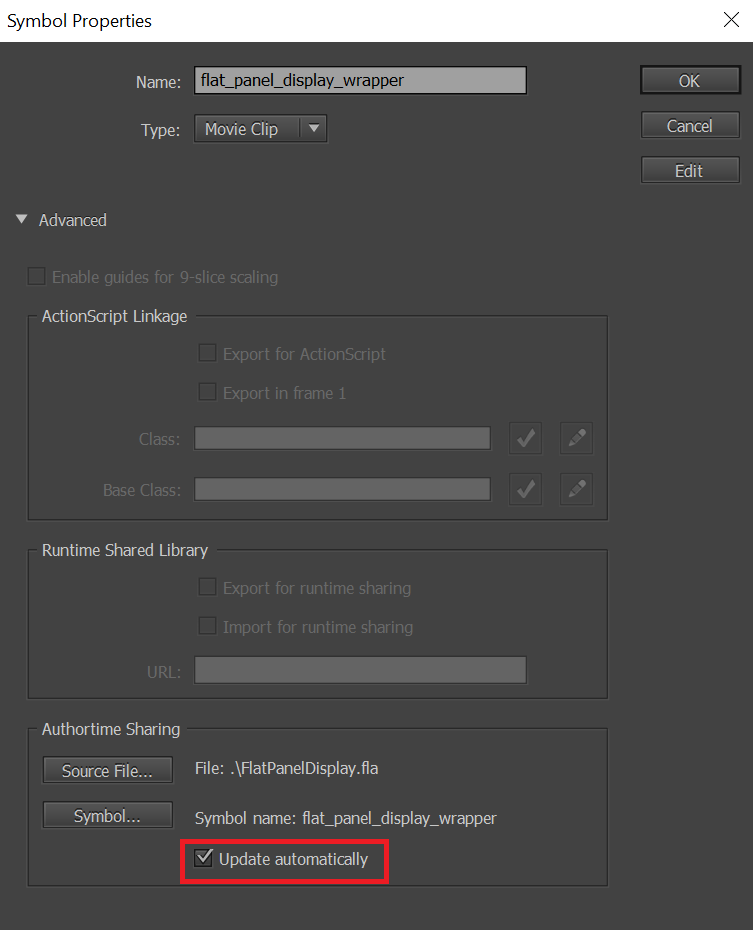
Symbol Properties window will open, in the Authortime Sharing section select the Source File button and navigate to the location of the file and click Open.

location

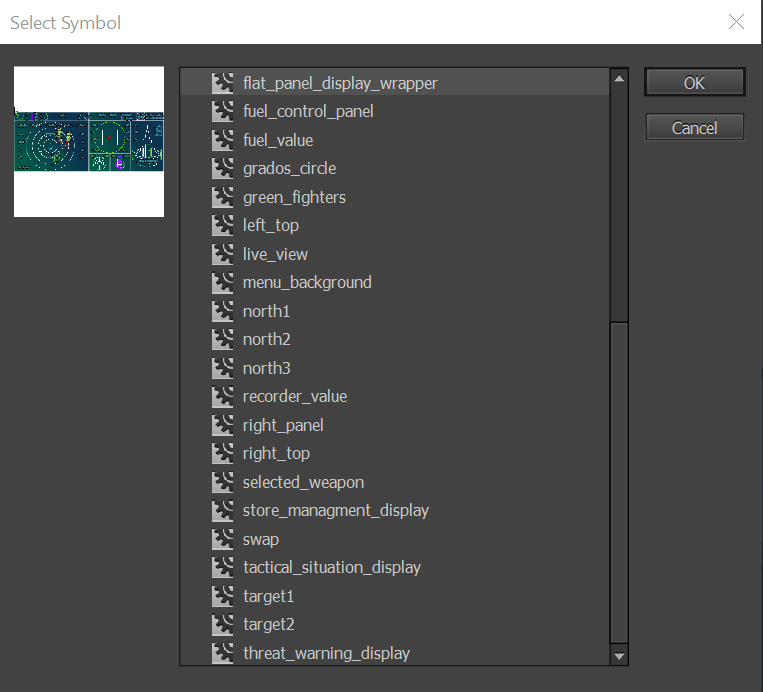
Select Symbol window will appear, select the widget Symbol, in our case flat_panel_display_wrapper and click OK.

UI select symbol

The last step is to add a tick to the Update automatically checkbox from the Symbol Properties window and click OK.

updae automatically

Do the same with the Altitude Indicator and the Head-up Display. Now when we edit each of the separate widgets the changes will be reflected in the master file.

The post Modular design in game UI appeared first on Coherent Labs.

Hummingbird 1.11 released!

$
0
0

As you can probably guess, we’ve got a couple of dedicated dev teams working on different subsystems of the technology. Some of our releases are focused around teams whose work can’t be easily visualized and I have to get creative – it’s not particularly easy to excite you with a video of someone writing JavaScript code.

Today’s release is not one of those.

New visual features

Let’s start with the prettiest of the prettiest. How do you like your blend modes?

animated blend modes in UI

Let me say that again, how do you like your blend modes?

blend modes in UI

Hummingbird 1.11 comes with support of the CSS property mix-blend-mode, which allows you to combine images, text and other elements of your UI and produce some effects that are otherwise impossible like the ones shown above. Of course, this is already integrated in our Adobe Animate Exporter so you can just create the blend modes there as you would normally and they’ll get exported.

Moving on, we’ve improved our SVG support, a lot. For example, we’ve got you SVGs as masks so you can use arbitrary shapes for masks – how do you like a tiger-shaped progress bar:

animated progress bar svg

For a complete list of all SVG changes, check the changelog.

The final rendering addition I’d like to showcase is the newly added support for letter spacing, which allows you to tell Hummingbird how much space should there be between letters (you would’ve never guessed from the name now, would you?). Even better, letter spacing is animatable and this allows you do animations like this one:

UI letter spacing animation

New UI samples

I know there were a bunch of SciFi shooters announced at E3 but none of those games are the ones you should be excited about. Our Unreal Engine 4 plugin now comes with a new sample level that will definitely beat most games announced at E3, well at least in the UI department:

FPS UI sample

A repeating question we’ve heard is ‘But can I load files over HTTP?’ and while the answer has always been ‘Yeah, but you need to extend your integration to support it’ we thought this wasn’t enough so now you get the power of the web in Hummingbird. This version comes with 2 other new samples focused on showing you how to use HTTP(S) – one in our standard native package and one in our UE4 plugin:

UI HTTP

HTTP support gives you a lot of freedom about how you get your assets and data. Want to do a seamless update of the UI without forcing the user to download the actual? Just push it to your server and let the UI handle it, why bother writing it yourself?

Tool enhancements

Our beloved DevTools which let you peek under Hummingbird’s hood received yet another update. The Elements panel, responsible for displaying the structure of your UI, now supports modifications and allows you to test out new ideas without reloading the page.

Is that the correct color of the text? Is this the correct position of my minimap? How will the UI look if I remove this altogether?

UI live editing

You will also notice how in this GIF the element we are manipulating now has a semi-transparent blue overlay allowing you to intuitively understand what exactly is being changed. Similarly, if you want to find a particular piece of UI in the tree, just hit the ‘Select element’ button on the top left and pick it.

Hummingbird 1.12 is already in the works and we are planning a couple of surprises I believe you’d really enjoy. Bad news is I probably won’t have this much GIFs to share so you’ll have to take the video of someone writing JavaScript code.

The post Hummingbird 1.11 released! appeared first on Coherent Labs.

Learn how to use Async/Await!

$
0
0

In brief, we will demonstrate how to use the Async/Await JavaScript feature.

Async/Await Overview

In case you missed it, ES 2017 introduced Asynchronous functions and brought us full Async/Await support.

For those JavaScript enthusiasts and our inquisitive readers who have never heard of this topic before, we would give you a quick explanation.

Async/Await is the new way to write asynchronous code. Previous solutions for writing asynchronous code were callbacks and promises. Moreover, Async/Await is built on top of promises. It cannot be used with plain callbacks. In this sense Async/Await is like promises, non-blocking.

We should appreciate Async/Await because it makes asynchronous code look and behave a little more like synchronous code. This is where all the Async/Await power lies.

In order to easily understand the differences between promises and Async/Await, we will show you a very simple example.

Let’s assume we have a function called getData that returns a promise and we want to resolve that promise. We would call and log our data. In the end, we would return “Finish” to ensure everything is done correctly.

Using promise will look like this:

const createRequest = () => 
  getData()         
    .then(data => { 
      console.log(data)
      return "Finish";
    });

createRequest();

This is what it looks like with Async/Await:

const createRequest = async () => {
  console.log(await getData())
  return "Finish";
}

createRequest();

How to use Async/Await to get and manipulate data

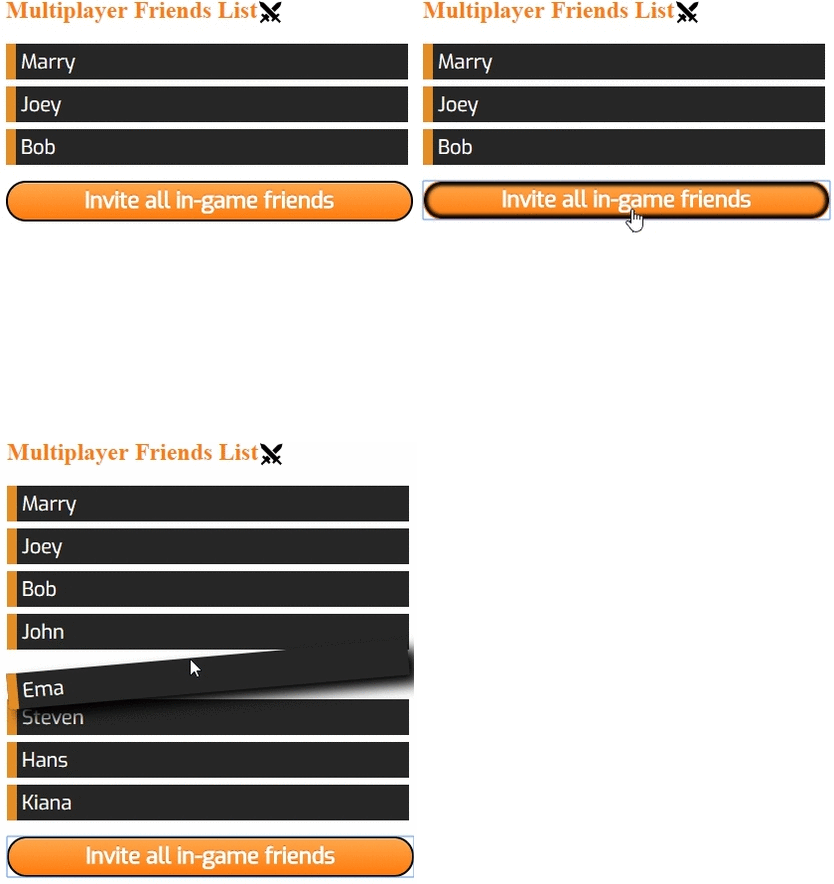
Getting data with Async/Await is not difficult. See how you can create a “Multiplayer Friends List” and invite all your friends (asynchronous) by clicking the invite button.

let friendsToInvite = ["John", "Ema", "Steven", "Hans", "Kiana"];

async function inviteFriends(array) {
  let list = document.getElementById("list");
  await Promise.all(array.map(async (item) => {
    await (item);
    let friend = document.createElement('li');
    friend.appendChild(document.createTextNode(item));
    list.appendChild(friend);
    return list;
  }))
}

let button = document.createElement('button');
button.textContent = "Invite all in-game friends";
button.onclick = function () {
  document.getElementById('main').appendChild(inviteFriends(friendsToInvite));
};
document.body.appendChild(button);

This is how our Multiplayer Friends List works.

Notes: Additional files are needed!
See the whole example here!

Ensuring type safety with TypeScript

After our last TypeScript tutorial, let’s practice what we learned. Furthermore, we will mix TypeScript and Async/Await to write something similar to our Multiplayer Friends List.

let friends: string[] = ["John", "Ema", "Steven"];
let invitedFriends: string[] = ["Rose", "Nick"];
async function inviteFriends() {
    let invitations: string[] = await Promise.all(friends.map(async (friend): Promise<string> => {
        await (friend);
         invitedFriends.push(friend);
        return "done";
    }))

    let elem = document.getElementById("button");
    elem.parentElement.removeChild(elem);
    document.getElementsByTagName("body")[0].innerHTML =`You successfully invited ${invitedFriends.join(",")} to your multiplayer party!`;
};
let button = document.createElement('button');
button.textContent = "Invite all in-game friends";
button.onclick = function() {
    inviteFriends();
};
document.body.appendChild(button).setAttribute('id','button');

You can test and play with TypeScript and Async/Await following our TypeScript Tutorial.

Note: In Step 4 of the TypeScript Tutorial replace --target es6 with the latest --target es2017.

Recommended reads:

JavaScript ES 2017: Learn Async/Await by Example
Async/Await Essentials for Production
6 Reasons Why JavaScript’s Async/Await Blows Promises Away
TypeScript – Async and Await
ES2017 Async/Await to the rescue!

The post Learn how to use Async/Await! appeared first on Coherent Labs.

Development process in CL

$
0
0

At Coherent Labs, we build technologies and tools for one of the most critical audiences in the IT industry – game developers. Nothing, but the best quality software will do for them.

Software quality has many dimensions. In this blog post, I’ll mostly focus on how we ensure the user-facing quality – the fact that the software must work correctly and perform adequately (should be very fast in our case). Other dimensions of quality include modifiability, testability, scalability, which in the end are reflected in the user-facing quality attributes.

Development process

To ensure the high-quality standard we strive for, we employ a mix of human actions, tools & automation. Developing a new feature involves multiple steps until it finally lands in the hands of our users.

For each feature:

• The developer(s) extracts all the requirements from the major stakeholders. In our case, this can include the Product Manager, Software Architect, CTO, Team lead & Design team.

• The developer creates a Design document – this is a high-level document that should answer important questions such as:

– What should I do?

– How am I going to do it (technically)?

– What risks do I see?

– How will I test the new feature?

– How much time I believe it’ll take?

• The design document is discussed with anyone who can contribute to the project. In most cases, these people are the stakeholders and developers. Design docs allow us to significantly reduce the risk for the development of new features and make sure that all members of the team are on the same page. It also has the benefit of remaining as a long-term artifact to remind us how a certain feature was designed at the beginning and what decisions were made. It can be invaluable down the road if the feature has to be modified somehow or faults are found and the developer who created it can’t remember all the details. In my experience, I keep certain decisions in my head for max 1-3 weeks, after that I either have to rewind everything in my head (long and tough process) or look at some notes.

• After the design is approved by the teams, the developer writes the actual code. Now he/she knows exactly what needs to be done and how. The actual code-writing is expected to be easy and frictionless.

• When the feature is ready, the developer creates multiple tests – both for the current feature and automated regression tests. The automation infrastructure is explained later in the post.

• When all tests pass, the developer moves the feature in the Code review stage. Each new piece of code has to get 2 “Ship It” from other devs. We are very democratic at this stage, every developer can review whatever he/she wants. It usually happens that the featured creator himself appoints to the review at least 1 team member that is familiar with the sub-system. The Code review stage is important, not only because it improves the quality of the features, but also gives much better visibility to all team members. We use Reviewboard.

• After the feature has received the needed “Ship It”, it is shown to QA. This allows the QA team to know what to expect, how to test and make sure the feature is aligned with the requirements.

• At this stage, the feature is merged back into the main branch. QA works always off the main branch.

The following steps illustrate the most important “human” part of the process. To facilitate and make the development faster, we have introduced numerous tolls in the pipeline.


Automation tools

Build automation

Our products currently support at least a dozen platforms and game engines. This means that it’s unfeasible to require every developer to build & run his/her code for each one of them. Build machines are employed that continuously compile & test the projects across multiple platforms. The coordination is performed with BuildBot and hand-written scripts. Developers can leverage the infrastructure by running builds and test on feature branches.

Build machines run 3 distinct types of builds for the products:

• Smoke builds – run after every commit and make sure the product builds and passes the most important tests. Smokes have to be fast, so they only run the most basic sanity checks.

• Nightly builds – run every night and cover all platforms and tests, including performance regression checks.

• Release builds – when we tag a version for release, it is essentially the same as the nightly, but gets a release version.

Test automation

We run different types of test that cover the functionality of our products:

• Unit tests – multiple internal systems are covered with unit tests to improve their reliability. We use Google Test as a framework for our tests.

• Layout tests – these are more high-level tests that run in an application that internally uses Hummingbird/GT. The tests usually produce a screenshot that is compared to a committed golden master. Many tests also support JavaScript logic through the mocha/chai frameworks. They allow us to do more precise checks on specific values. For instance, a certain animation should be at a certain point after 0.5s etc.

• Graphics tests – Our rendering library Renoir is extensively tested as a standalone package. It powers all our products and it’s important to make sure it always works reliably in isolation.

• Performance tests – we have a custom tool that runs a test suite on game consoles and checks the performance. If any profiled function on any test has become slower, the build fails. This is an extremely important aspect because seemingly subtle changes can have a negative impact on the performance of the software. The tool makes sure we always improve things. Historic results are kept in a database and allow us to plot changes over longer periods of time.

Additional tooling

Along with tests, we have an additional set of tools that are currently run by hand by QA or developers.

• Code coverage – a tool is used that calculates C++ code coverage of tests. When a developer writes new features and tests for it, she can check that she has covered all the new code. QA also routinely runs coverage of all tests and looks for portions of the source that are not exercised.

• Fuzzing – we have a tool that generates fuzzy tests continuously and runs our products on them. In our case, the fuzzer generates random HTML pages. The tool then runs Hummingbird on the random page and monitors it for asserts/crashes. If such is detected, the HTML page, log file, and a complete memory dump are recorded for inspection by a developer. The fuzzer has been very successful in finding some defects that are very difficult to encode in a test by hand – for instance very large and somewhat chaotic mutations of the DOM. We use the same tool to also generate and test our declarative data binding system.

• Static analysis – we periodically run static code analysis tools on the software. So far we’ve had some minor bugs detected by them, but nothing really serious. I believe that is due to the strict development process we enforce.

Future developments

The next iteration of our internal tools will see better integration of the code coverage and fuzzing tool. So far, the fuzz tests are completely random – this is not ideal, because they tend to exercise the same code paths very often. This means that catching a bug becomes quite unlikely. We plan to try some genetic programming techniques to make the fuzzer smarter and guide it through the code coverage tool. Genetic algorithms have been shown to dramatically improve the effectiveness of fuzzing and we are eager to try it for ourselves.

The post Development process in CL appeared first on Coherent Labs.

Hummingbird 1.12 released!

$
0
0

The pride of this release is one amazing new feature – shape morphing.

Shape morphing, as the name suggests, allows you to morph one shape into another one. Perhaps you’ve seen the amazing UI of Persona 5 which by itself is as impressive as some entire games out there:

Notice the blue quadrilateral over the currently selected menu item – the animation of its vertices is exactly a shape morph.

Shape morphs are impressive in that most other ways to animate objects in UI systems is limited to animating colors and positions of the object itself whereas this allows you to animate per-vertex and even – per shape. You aren’t just limited to moving points around – you can have a rectangle become a circle become a tiger become really anything. Here are some examples of shape morphing running in Hummingbird:


(How about a round of applause for the devs who implemented the feature?)

Now the big question is – how do you specify shape morphs? We’ve extended the SVG format to support them and although in theory you can add them to existing SVG files, in practice it makes more sense to use our Adobe Animate Exporter to generate them automatically. Stay tuned for its next version that will allow you to do exactly that.

Quantity * Quality

Instead of adding a handful of big features, this release adds a bunch of minor enhancements, a full list of which you can enjoy in the changelog. I am just going to show you one of them – the ability to apply different X and Y blurs to an element.


Presto, motion blur!

Finally, let me give you a small preview for the upcoming 1.13 and 1.14. We are in the process of adding a couple of big new things to Hummingbird. For example, some massive optimizations of our rendering pipeline that will reduce the number of draw calls by an order of magnitude. We are also adding VIDEO playback support! We heard your feedback about all the effects you want to achieve with it and soon enough you’ll be able to implement them all. Cinematics? Check. Particle effects? Check. Prerendered animated avatars? Check.

Stay tuned for our upcoming releases and if you want to be the first one to hear about them, make sure to follow me or Coherent Labs.

The post Hummingbird 1.12 released! appeared first on Coherent Labs.


Taking the Next Step: А New Brand Identity for Coherent Labs

$
0
0

The initial goal

Back in 2012, four developers with years of experience in the gaming industry came up with an innovative idea for game UI creation. Through the use of modern web technologies like HTML5, they wanted to help both designers and developers make stunning and powerful interfaces, without limiting the game’s creativity and performance. Four generations of Coherent Labs products later, we can safely say that the initial goal has been achieved!

In the beginning, the company’s brand identity was assembled bit by bit and using the resources available at hand. In fact, almost all aspects of our identity were created by friends, including our logo. The idea for it was pretty simple – the name in a thick, techy font. The website was fairly modest and we hardly had any presence on social networks. At the time, all of the efforts went into making the most advanced software for game UI development, while the brand and visual identity were put on the back burner.

Who are we today

As time passed, Coherent Labs grew from just a few employees to a team of over 50 motivated people! Today, we are proud to offer the best UI solution and be a reliable partner of more than 200 game studios. Hard work and customer feedback helped us grow from a small tech startup to a mature company that teams up with the leaders in the game industry and plays a role in some of the most popular games made in recent history – like PUBG and Sea of Thieves.

We wanted to mark this important transition and announce that we are working on a fresh new brand identity! We have many exciting news and updates coming up as we want to make you a part of the process and have your valuable feedback. If you want to stay up to date, follow us on social media.

The post Taking the Next Step: А New Brand Identity for Coherent Labs appeared first on Coherent Labs.

Hummingbird 1.14 released!

$
0
0

Sometimes you need a couple of months to build the next big feature. Other times you get ambitious and want to put several features in the same release. Then there are these times when you do both and a release comes out that has several big features that took few months each. These times are today because Hummingbird 1.14 has so many major changes I seriously considered naming it 2.0.

Let’s start with the most impressive things first.

V-v-v-ideo support!

You know the old saying – a picture is worth a thousand words. Since a video is 60 pictures per second, here are the next 840k words of this blog post:

Credits for the above video go to the Peach Project of the Blender Foundation

Aside from the obvious usage (cinematics and tutorials), you can also do particle effects! Behold, transparent videos:

Credits for the above video go to CyberWebFX

Audio is also supported but you will need to hook Hummingbird’s audio decoder with your audio system. If you are using Unreal Engine 4, that’s already taken care of. If you have a custom engine, check the new video sample which contains 2 reference implementations.

In case you are wondering what are the limitations and performance (hint: it’s as fast as it gets and on a worker thread), what codecs do we support and so on, check the documentation.

Rendering optimizations

We pride ourselves on Hummingbird’s performance because it’s the fastest UI tech around but we know there’s also room for improvement. By dramatically reducing the number of draw calls, our rendering team improved the CPU performance of our rendering by about 30% on mobile devices while keeping the desktop/console version unchanged.

We discovered that these changes improved the performance everywhere because the GPU driver did much less work. However, on PC and consoles the extra overhead in our own code was too much to keep so we decided to only keep them on mobile.

Here’s a helpful chart which shows the actual improvement as measured in our stress tests on 2 different mobile devices (Google Nexus and Google Pixel):

Note: standard UI rendering time is much lower, those stress tests are designed to be…well, stressful on the SDK.

You are probably wondering what does the ‘With atlasing’ part mean…

Texture atlasing (batching)

As part of the efforts to improve rendering performance, we saw how expensive it is to swap textures on mobile devices so another huge improvement we added are tools that automatically generate atlases i.e. big textures that contain several small textures. By using atlases we can reduce the stress on the driver and this nets another 50% improvement in CPU times.

Atlases require 2 steps to get them to work – generate the atlases in the first place and tell Hummingbird which atlas to use for which image.

If you have your own engines – take a look at the newly added AtlasMaker tool and check out the new sample Sample_TextureAtlasing designed to showcase its usage.

If you are running UE4 – check the new submenu in the Editor or follow our docs to learn how to take advantage of batching.

You are able to manage what gets placed in which atlas within a custom editor window:

Data binding events

A pet peeve of mine was one specific scenario for which the data binding system wasn’t well adapted. Assume you are building an inventory and want to add a on hover effect that displays a tooltip with more information about the hovered item. This would require you to pass information about the current element to the event handler of the mouse over. Unfortunately, before Hummingbird 1.14 input event handlers didn’t have access to the values of the data binding system. This necessitated some clever usage of the surrounding elements to store the information which the event handler would read.

This release makes it much more straightforward by letting you specify mouse handlers that can access the data binding system:

<div class="shop-menu" data-bind-for="item:{{g_Shop.items}}">
        <div class="item-box" data-bind-click="g_Shop.buyItem({{item}})">
        </div>
    </div>

See the docs for further details.

Unreal Engine 4 experimental mobile support

Our Epic Hummingbird just flew in to say ‘Hi’ to the friendly green android and his friend the half-bitten apple.

Epic Games recently pushed a lot of improvements to Unreal specifically for mobile. The quality of their demos is amazing and this has prompted multiple studios to ask us specifically to support it. Мost of the performance optimizations I listed above were developed as part of the process of getting the most out of UE4’s mobile version. That being said, starting from 1.14, you can run Hummingbird, in Unreal, on both iOS and Android! Current support is still experimental because we are aware of a couple of rare corner cases in which the plugin doesn’t behave as expected but other than that you get the full experience of the SDK, just like you would on PC and consoles.

For this we created yet another sample that you’ll get to enjoy in 1.15 once we polish it but here’s a teaser:

Head over the developer portal to download the update and let me know what you think of all the changes!

The post Hummingbird 1.14 released! appeared first on Coherent Labs.

On the road to HTML5

What you need to know about Hummingbird’s support for Nintendo Switch

Introducing Coherent Console Fonts

Viewing all 172 articles
Browse latest View live


Latest Images